|
Hyspan Barco Ball Joints
Installation and Maintenance Procedures
Standard Series & 600 Series Ball Joints
Installation Recommendations

|
1.
|
|
The media flow direction can be from either end of the ball joint except for liquids with suspended solids, then flow should be from ball end to casing end.
|
|
|
2.
|
|
In vertical installations, ball joints should be installed with the ball end down to prevent foreign matter from collecting between neck of ball and retainer.
|
|
|
3.
|
|
Do not loosen the ball joint retainer during installation, or utilize ball joints as Unions. Each joint is factory preset and tested before shipment. LOOSENING OF THE BALL JOINT RETAINER IS NOT RECOMMENDED. If the retainer must be loosened it should be loosened 1/4 of a revolution maximum, and retightened an equal amount before any pressure testing or flushing of the line. There is a setscrew to maintain the position of the retainer - be sure the setscrew is loosened and retightened after the adjustment and prior to applying pressure.
|
|
|
4.
|
|
Use CAUTION PREHEATING, WELDING, OR POST WELD HEAT-TREATING ball joints into the line. Excessive heating of the sealing area may cause leakage.
|
|
|
5.
|
|
Protect the exposed ball surface from weld splatter, and prevent dirt and debris from collecting around neck of the ball.
|
|
|
6.
|
|
Although ball joints can be rotated or twisted around the centerline, they are designed to absorb motion by the Offset Method that utilizes angular flex to provide the required movement. Consult a Hyspan Barco sales representative or contact Hyspan by email at websales@hyspan.com if an application involves extensive rotating motion.
|
|
|
|
|
|
General Warning
Standard Series and 600 Series Hyspan Barco Ball Joints are not designed for maintenance to be performed while the system is pressurized. DO NOT PERFORM ANY ADJUSTMENTS TO A BALL JOINT THAT IS PRESSURIZED.
Maintenance Instructions
To correct leaks or to perform routine maintenance:
|
1. |
|
Relieve the internal pressure. |
|
2. |
|
Loosen the retainer setscrew and tighten retainer until it is snug against the ball using
a reasonable amount of torque with manual wrenches. Tighten the setscrew and pressurize the system. If leakage still occurs the ball joint can be disassembled for maintenance
|
|
3.
|
|
TO DISASSEMBLE the ball joint for maintenance it must be removed from the system.
|
|
a.
|
|
Disassemble by loosening the setscrew and removing the retainer.
|
|
b.
|
|
Inspect the inner seal for wear: The inner seal is seldom worn enough to require replacement. It is recommended that the outer seal should be replaced.
|
|
c.
|
|
Clean and inspect ball surface carefully. Replace the ball if it is worn, scored or pitted.
|
|
d.
|
|
Replacement balls and seals are available from an authorized Hyspan Barco representative or by contacting Hyspan by email at websales@hyspan.com. Be certain to dispose of the discarded seals properly.
|
|
e.
|
|
To reassemble, coat the surfaces of seal(s) and ball with a light coat of assembly lubricant. For service over 350º F use molybdenum disulfide based lubricant.
|
|
f.
|
|
If the inner seal has been removed, install it in the case with the concave surface
out by tapping it in place evenly with a soft mallet.
|
|
g.
|
|
Slide new outer seal over extended end of ball with the concave surface mating to
the convex surface of ball.
|
|
h.
|
|
Replace ball into case.
|
|
i.
|
|
Tap the new outer seal evenly with soft mallet into casing around ball.
|
|
j. |
|
Add thread lubricant to retainer threads and replace the retainer - tighten until the seals are snug against the ball with a reasonable amount of torque with manual wrenches. Do not back off. Tighten the setscrew.
|
|
Note: In some sizes with 90º balls, it may be necessary to slip seal and retainer over the ball before seating ball and seal into case to provide clearance at neck or elbow.
|
|
|
|
|
|
|
Type N Style I Ball Joints
Installation Recommendations
|
|
1.
|
|
The media flow direction can be from either end of the ball joint except for liquids with suspended solids, then flow should be from ball end to casing end.
|
|
|
2.
|
|
In vertical installations, ball joints should be installed with the ball end down to prevent
foreign matter from collecting between neck of ball and retainer.
|
|
|
3.
|
|
Do not loosen the ball joint retainer during installation, or utilize ball joints as Unions. Each joint is factory preset and tested before shipment. LOOSENING OF BALL JOINT RETAINER IS NOT RECOMMENDED. If the retainer must be loosened, loosen the bolting 1/4 revolution maximum using a standard crossing pattern. Retighten the bolting using the procedure outlined in Paragraph 2 of the Maintenance Instructions below.
|
|
|
4.
|
|
Use CAUTION PREHEATING, WELDING, OR POST WELD HEAT-TREATING ball joints
into the line. Excessive heating of the sealing area may cause leakage.
|
|
|
5.
|
|
Protect the exposed ball surface from weld splatter, and prevent dirt and debris from
collecting around neck of ball.
|
|
|
6.
|
|
Although ball joints can be rotated or twisted around the centerline, they are designed to absorb motion by the Offset Method that utilizes angular flex to provide the required movement. Consult a Hyspan Barco sales representative or contact Hyspan by email at
websales@hyspan.com if an application involves extensive rotating motion.
|
|
|
|
|
|
General Warning
Type N Style I Hyspan Barco Ball Joints are not designed for maintenance to be performed while the system is pressurized. DO NOT PERFORM ANY ADJUSTMENTS TO A BALL JOINT THAT IS PRESSURIZED.
Maintenance Instructions
To correct leaks or to perform routine maintenance:
|
|
1.
|
|
Relieve the internal pressure.
|
|
|
2.
|
|
Tighten retainer bolting to a maximum of twice the factory torque settings that are given below. Use a standard crossing pattern.
Number 11 Composition Seals
|
Nominal Size(s)
|
Factory Torque (ft.-lbs.)
|
|
2 1/2" & 3"
|
12 to 15
|
|
4", 5" & 6"
|
40 to 50
|
|
8" through 30"
|
80 to 90
|
|
|
|
Number 24 Glass Filled Teflon® Seals
|
Nominal Size(s)
|
Factory Torque (ft.-lbs.)
|
|
2 1/2"
|
4-5
|
|
3" & 4"
|
8-10
|
|
5" & 6"
|
12-14
|
|
8"-14"
|
24-26
|
|
16"-24"
|
20-24
|
|
|
|
If leakage still occurs the ball joint can be disassembled for maintenance.
|
|
|
3.
|
|
TO DISASSEMBLE the ball joint for maintenance it must be removed from the system.
|
|
a.
|
|
Disassemble by loosening the retainer bolts and removing the retainer.
|
|
|
b.
|
|
Inspect the inner seal for wear: The inner seal is seldom worn enough to require replacement. It is recommended that the outer seal should be replaced.
|
|
|
c.
|
|
Clean and inspect ball surface carefully. Replace the ball if it is worn, scored or pitted.
|
|
|
d.
|
|
Replacement balls and seals are available from an authorized Hyspan Barco representative or by contacting Hyspan by email at websales@hyspan.com. Be certain to dispose of the discarded seals properly.
|
|
|
e.
|
|
To reassemble, coat the surfaces of seal(s) and ball with a light coat of assembly lubricant. For service over 350º F use molybdenum disulfide based lubricant.
|
|
|
f.
|
|
If the inner seal has been removed, install it in the case with the concave surface
out by tapping it in place evenly with a soft mallet.
|
|
|
g.
|
|
Slide new outer seal over extended end of ball with the concave surface mating
to the convex surface of ball.
|
|
|
h.
|
|
Replace ball into case.
|
|
|
i.
|
|
Tap the new outer seal evenly with soft mallet into casing around ball.
|
|
|
j.
|
|
Replace the retainer tighten the bolting to the factory settings given in Paragraph
2 above.
|
|
|
|
|
|
|
Type N Style II, OW 1500 Style II & ASME Class Ball Joints
Installation Recommendations
|
|
1.
|
|
The media flow direction can be from either end of the ball joint except for liquids with suspended solids, then flow should be from ball end to casing end.
|
|
|
2.
|
|
In vertical installations, ball joints should be installed with the ball end down to prevent foreign matter from collecting between neck of ball and retainer.
|
|
|
3.
|
|
Do not loosen the ball joint retainer during installation, or utilize ball joints as Unions.
Each joint is factory preset and tested before shipment. LOOSENING OF THE BALL JOINT RETAINER IS NOT RECOMMENDED. If the retainer must be loosened, loosen bolted retainers by loosening the bolting 1/4 revolution maximum using a standard crossing pattern. Retightened using the procedure outlined in Paragraph 7(j) of the Maintenance Instructions below. OW 1500 Style II ball joints have threaded retainers. Loosen the retainer 1/4 revolution maximum and retighten the same rotation.
|
|
|
4.
|
|
Use CAUTION PREHEATING, WELDING, OR POST WELD HEAT-TREATING ball joints into the line. Excessive heating of the sealing area may cause leakage.
|
|
|
5.
|
|
Protect the exposed ball surface from weld splatter, and prevent dirt and debris from .
collecting around neck of ball.
|
|
|
6.
|
|
Although ball joints can be rotated or twisted around the centerline, they are designed to absorb motion by the Offset Method that utilizes angular flex to provide the required movement. Consult a Hyspan Barco sales representative or contact Hyspan by email at websales@hyspan.com if an application involves extensive rotating motion.
|
|
|
|
|
|
|
 |
|
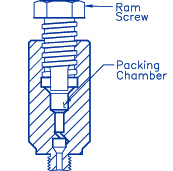
Style II Recharge Cylinder
|
General Warning
Type N Style II, OW 1500 Style II and ASME Class Hyspan Barco Ball Joints are not designed for maintenance to be performed while the system is pressurized. DO NOT PERFORM ANY ADJUSTMENTS TO A BALL JOINT THAT IS PRESSURIZED.
Maintenance Instructions
To correct leaks or perform routine maintenance.
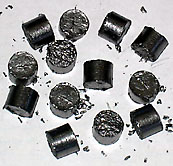
In order to repack Type N Style II, OW 1500 Style II and ASME Class Hyspan Barco Ball Joints a recharge cylinder (Part Number 10-64416-43) and packing pellets available in reload kits of 13 pellets (Part Number 10-64715-00) will be required. These products are available from an authorized Hyspan Barco representative or contact Hyspan at websales@hyspan.com.
|
1. |
|
Relieve the internal pressure and allow ball joint to cool to a safe temperature for
handling.
|
|
|
2. |
|
Remove all of the charging port plugs.
|
|
|
3. |
|
Prior to installing the recharge cylinder remove the ram screw and insert one (1) packing pellet. Replace the ram screw and rotate until a small amount of sealant has been forced out of the tip of the cylinder. Apply thread lubricant to recharge cylinder threads, and thread the recharge cylinder into the one of the ball joint ports.
|
|
|
4. |
|
Inject sealant into the port by turning the ram screw until sealant is forced from the adjacent port. If necessary add additional packing pellets. Do not exceed 150 ft.-lbs of torque on the ram screw.
|
|
|
|
5. |
|
Remove the recharge cylinder. Sealant should expand from the port. Replace the port plug.
|
|
|
6. |
|
Thread the recharge cylinder into the adjacent port and repeat steps 5 and 6 until all of the ports have been charged and the plugs replaced. Be certain that all of the plugs have been replaced with the threads fully engaged and tightened prior to pressurizing. If leakage still occurs the ball joint can be disassembled for maintenance
|
|
|
7. |
|
TO DISASSEMBLE the ball joint for maintenance it must be removed from the system.
|
a. |
|
Disassemble the joint by removing the retainer.
|
|
b. |
|
Inspect the inner seal for wear: The inner seal is seldom worn enough to require replacement.
|
|
c. |
|
Clean and inspect ball surface carefully. Replace the ball if it is worn, scored or pitted.
|
|
|
|
|
|
|
d. |
|
Replacement balls, seals and packing are available from an authorized Hyspan Barco representative or contact Hyspan at websales@hyspan.com. Be certain to dispose of discarded seals and injected packing properly.
|
|
e. |
|
To reassemble, coat the surfaces of the seal(s) and ball with a light coat of assembly lubricant. For service over 350º F use molybdenum disulfide based lubricant.
|
|
f. |
|
If the inner seal has been removed, install it in the case with the concave surface out by tapping it in place evenly with a soft mallet.
|
|
g. |
|
Slide new outer seal over extended end of ball with the concave surface mating to the convex surface of ball.
|
|
h. |
|
Replace ball into casing.
|
|
i. |
|
Tap the new outer seal evenly with plastic or rubber hammer into casing around ball.
|
|
j. |
|
For bolted retainers tighten retainer bolting to the following factory torque settings using a standard crossing pattern.
Number 11 Composition Seals
| Nominal Size(s) |
Factory Torque (ft.-lbs.) |
| 2 1/2" & 3" |
12-15 |
| 4" through 6" |
40-50 |
| 8" through 30" |
80-90 |
|
|
Number 21 Ductile Iron & Other Metal Seals
| Nominal Size(s) |
Factory Torque (ft.-lbs.) |
| 2 1/2" |
6 |
| 3" & 4" |
10-12 |
| 5" & 6" |
14-16 |
| 8" through14" |
24-26 |
| 16" through 30" |
20-22 |
|
|
|
|
k. |
|
For the threaded retainer on OW 1500 ball joints add thread lubricant to the retainer threads and torque the retainer to 360 ft.-lbs.
|
|
l. |
|
Add the injected packing following Paragraphs 2 through 6 above. If possible perform an air and soap bubble leak test before reinstalling.
|
|
|
|
|
|
|
Type N Style III Ball Joints
Installation Recommendations
|
|
1.
|
|
The media flow direction can be from either end of the ball joint except for liquids with suspended solids, then flow should be from ball end to casing end.
|
|
|
2.
|
|
In vertical installations, ball joints should be installed with the ball end down to prevent foreign matter from collecting between neck of ball and retainer.
|
|
|
3.
|
|
Do not loosen the ball joint retainer during installation, or utilize ball joints as Unions. Each joint is factory preset and tested before shipment. LOOSENING OF BALL JOINT RETAINER IS NOT RECOMMENDED. If the retainer must be loosened, loosen the bolting 1/4 revolution maximum using a standard crossing pattern. Retighten the bolting using the procedure outlined in Paragraph 6(j) of the Maintenance Instructions below.
|
|
|
4.
|
|
Use CAUTION PREHEATING, WELDING, OR POST WELD HEAT-TREATING ball joints into the line. Excessive heating of the sealing area may cause leakage.
|
|
|
5.
|
|
Protect the exposed ball surface from weld splatter, and prevent dirt and debris from collecting around neck of ball.
|
|
|
6.
|
|
Although ball joints can be rotated or twisted around the centerline, they are designed to absorb motion by the Offset Method that utilizes angular flex to provide the required movement. Consult a Hyspan Barco sales representative or contact Hyspan by email at websales@hyspan.com if an application involves extensive rotating motion.
|
|
|
|
|
|
General Warning
Type N Style III Hyspan Barco Ball Joints are designed for repacking to be performed while
the system is pressurized utilizing integral recharge cylinders. DO NOT PERFORM ANY ADJUSTMENTS TO THE RETAINER OF A BALL JOINT THAT IS PRESSURIZED. There
are plugged ports between the recharge cylinders that are for factory use only - do not remove these plugs.
Maintenance Instructions
To correct leaks or to perform routine maintenance.
In order to repack Type N Style III Hyspan Barco Ball Joints packing pellets are required that
are available in reload kits of 13 pellets (Part Number 10-64715-00). Reload kits are available from an authorized Hyspan Barco representative or contact Hyspan at websales@hyspan.com).
|
|
1.
|
|
Type N Style III ball joints are designed to be recharged by injecting packing under full line pressure provided the correct safety precautions are observed. Recharge only if aleak occurs. Only Hyspan packing material must be used. Recharging is accomplished by injecting packing through the recharging cylinders - DO NOT PERFORM ANY
ADJUSTMENTS TO THE RETAINER OF A PRESSURIZED BALL JOINT. DO NOT RECHARGE WHILE PRESSURIZED IF LEAKAGE APPEARS THROUGH OR ARROUND A RECHARGE CYLINDER.
WEAR EYE PROTECTION (FULL FACE MASK) AND PROPER SAFETY APPAREL.
|
|
|
2.
|
|
Remove the ram screw from the recharge cylinder nearest the point of leakage.
|
|
|
3.
|
|
Add lubricant (molybdenum disulfide based) to ram screw threads and insert one packing pellet in the chamber, and start ram screw.
|
|
|
4.
|
|
Inject sealant into the port by turning the ram screw until it is bottomed against the cylinder. Do not exceed 250 ft.-lbs of torque on the ram screw.
|
|
|
5.
|
|
Repeat Paragraphs 3 and 4 for the remaining recharge cylinders or until the leakage stops. Insert one pellet per cylinder. Repeat Paragraphs 3 and 4 one additional packing rotation or until leakage stops. If leakage still occurs the ball joint can be disassembled for maintenance.
|
|
|
6.
|
|
TO DISASSEMBLE the ball joint for maintenance it must be removed
from the system.
|
|
a.
|
|
Disassemble joint by removing the retainer.
|
|
|
b.
|
|
Inspect the inner seal for wear: The inner seal is seldom worn enough to require replacement.
|
|
|
c.
|
|
Clean and inspect ball surface carefully. Replace the ball if it is worn, scored or pitted.
|
|
|
d.
|
|
Replacement balls, seals and packing are available from an authorized Hyspan Barco representative or contact Hyspan at websales@hyspan.com. Be certain to dispose of discarded seals and injected packing properly.
|
|
|
e.
|
|
To reassemble, coat the surfaces of the seal(s) and ball with a light coat of assembly lubricant. For service over 350º F use molybdenum disulfide based lubricant.
|
|
|
f.
|
|
If the inner seal has been removed, install it in the case with the concave surface out by tapping it in place evenly with a soft mallet.
|
|
|
g.
|
|
Slide new outer seal over extended end of ball with the concave surface mating to the convex surface of ball.
|
|
|
h.
|
|
Replace ball into casing.
|
|
|
i.
|
|
Tap the new outer seal evenly with plastic or rubber hammer into casing around ball.
|
|
|
j.
|
|
For bolted retainers tighten retainer bolting to the following factory torque settings using a standard crossing pattern.
Number 11 Composition Seals
|
Nominal Size(s)
|
Factory Torque (ft.-lbs.)
|
|
2 1/2" & 3"
|
12-15
|
|
4" through 6"
|
40-50
|
|
8" through 30"
|
80-90
|
|
|
|
Number 21 Ductile Iron & Other Metal Seals
|
|
|
k.
|
|
Add the packing following Paragraphs 2 through 6 above. Repeat the sequence until the packing no longer flows freely into the ball joint. If possible perform air and soap bubble leak test before reinstalling.
|
|
|
|
|
|
|
|
|
|
|
|
Type N Style III-V & OW 1500 Style III-V Ball Joints
|
 |
|
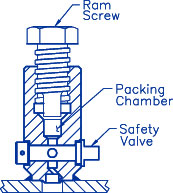
Style III-V Recharge Cylinder
|
Installation Recommendations
|
1. |
|
The media flow direction can be from either end of the ball joint except for liquids with suspended solids, then flow should be from ball end to casing end.
|
|
2. |
|
In vertical installations, ball joints should be installed with the ball end down to prevent foreign matter from collecting between neck of ball and retainer.
|
|
3. |
|
Do not loosen ball joint retainer during installation, or utilize ball joints as Unions. Each joint is factory preset and tested before shipment. LOOSENING OF BALL JOINT RETAINERS IS NOT RECOMMENDED. If the retainer must be loosened, loosen the bolting 1/4 revolution maximum using a standard crossing pattern. Retighten the bolting using the procedure outlined in Paragraph 7(j) of the Maintenance Instructions below.
|
|
4. |
|
Use CAUTION PREHEATING, WELDING, OR POST WELD HEAT-TREATING ball joints into the line. Excessive heating of the sealing area may cause leakage.
|
|
5. |
|
Protect the exposed ball surface from weld splatter, and prevent dirt and debris from collecting around neck of ball.
|
|
6. |
|
Although ball joints can be rotated or twisted around the centerline, they are designed to absorb motion by the Offset Method that utilizes angular flex to provide the required movement. Consult a Hyspan Barco sales representative or contact Hyspan by email at websales@hyspan.com if an application involves extensive rotating motion.
|
|
|
|
|
General Warning
Type N Style III-V and OW 1500 Style III-V Hyspan Barco Ball Joints are designed for repacking to be performed while the system is pressurized utilizing the integral recharge cylinders. DO NOT PERFORM ANY ADJUSTMENTS TO THE RETAINER OF A PRESSURIZED BALL JOINT. There are plugged ports between the recharge cylinders that are for factory use only - do not remove these plugs.
Maintenance Instructions
To correct leaks or to perform routine maintenance.
In order to repack Type N Style III-V and OW1500 Style III-V Hyspan Barco Ball Joints, packing pellets are required that are available in reload kits of 13 pellets (Part Number 10-64715-00). Reload kits are available from an authorized Hyspan Barco representative or contact Hyspan
at websales@hyspan.com).
|
|
1.
|
|
Type N Style III-V and OW 1500 Style III-V ball joints are designed to be recharged by injecting packing under full line pressure provided the correct safety precautions are observed. Recharge only if a leak occurs. Only Hyspan packing material must be used. Recharging is accomplished by injecting packing through the recharging cylinders - DO NOT PERFORM ANY ADJUSTMENTS TO THE RETAINER OF A PRESSURIZED BALL JOINT. DO NOT RECHARGE WHILE PRESSURIZED IF LEAKAGE APPEARSTHROUGH OR ARROUND A RECHARGE CYLINDER.
WEAR EYE PROTECTION (FACE MASK) AND PROPER SAFETY APPAREL.
|
|
|
2.
|
|
Select the recharge cylinder nearest the leak and rotate the 1/4 turn safety valve at the base of the cylinder to the off position (arrow is perpendicular to cylinder centerline).
|
|
|
3.
|
|
Remove the ram screw from the recharge cylinder selected.
|
|
|
4.
|
|
Add lubricant (molybdenum disulfide based) to ram screw threads and insert one packing pellet in the chamber and start ram screw two turns.
|
|
|
5.
|
|
Open the valve (arrow is inline with cylinder centerline) and inject the sealant into the port by turning the ram screw until it is bottomed against the cylinder. Do not exceed 250 ft.-lbs of torque on the ram screw.
|
|
|
6.
|
|
Repeat Paragraphs 3 through 5 for the remaining recharge cylinders or until the leakage stops. It leakage continues repeat Paragraphs 3 through 6 one additional packing rotation. If leakage still occurs the ball joint can be disassembled for maintenance.
|
|
|
7.
|
|
TO DISASSEMBLE the ball joint for maintenance, the ball joint it must be removed from the system.
|
|
a.
|
|
Disassemble the joint by removing the retainer.
|
|
|
b.
|
|
Inspect the inner seal for wear: The inner seal is seldom worn enough to require replacement.
|
|
|
c.
|
|
Clean and inspect ball surface carefully. Replace the ball if it is worn, scored or pitted.
|
|
|
d.
|
|
Replacement balls, seals and packing are available from an authorized Hyspan Barco representative or contact Hyspan by email at websales@hyspan.com. Be certain to dispose of discarded seals and injected packing properly.
|
|
|
e.
|
|
To reassemble, coat the surfaces of the seal(s) and ball with a light coat of assembly lubricant. For service over 350º F use molybdenum disulfide based lubricant.
|
|
|
f.
|
|
If the inner seal has been removed, install it in the case with the concave surface out by tapping it in place evenly with a soft mallet.
|
|
|
g.
|
|
Slide new outer seal over the extended end of ball with the concave surface mating to the convex surface of ball.
|
|
|
h.
|
|
Replace ball into casing.
|
|
|
i.
|
|
Tap the new outer seal evenly with plastic or rubber hammer into casing around ball.
|
|
|
j.
|
|
For bolted retainers tighten retainer bolting to the following factory torque settings using a standard crossing pattern.
Number 11 Composition Seals
|
Nominal Size(s)
|
Factory Torque (ft.-lbs.)
|
|
2 1/2" & 3"
|
12-15
|
|
4" through 6"
|
40-50
|
|
8" through 30"
|
80-90
|
|
|
|
Number 21 Ductile Iron & Other Metal Seals
|
Nominal Size(s)
|
Factory Torque (ft.-lbs.)
|
|
2 1/2"
|
6-7
|
|
3" & 4"
|
10-12
|
|
5" & 6"
|
14-16
|
|
8" through 14"
|
24-26
|
|
16" through 30"
|
20-22
|
|
|
|
|
|
|
k.
|
|
For the threaded retainer on OW 1500 ball joints torque the retainer to 360 ft.-lbs.
|
|
|
l.
|
|
Add the packing following Paragraphs 2 through 6 above. Repeat the sequence until the packing no longer flows freely into the ball joint. If possible perform air and soap bubble leak test before reinstalling.
|
|
|
|
|
|
|
Teflon® is a registered trademark of Dupont
|
|